
วันศุกร์ที่ 24 ธันวาคม พ.ศ. 2564
วันศุกร์ที่ 17 กันยายน พ.ศ. 2564
Trick การใช้ Bootstrap 5
จัดobjectให้อยู่ตรงกลาง
<div class="row justify-content-md-center" >
<div class="col-md-auto" style=background-color:lightgray;>
<h1>Adisak</h1>
</div>
</div>
วันอังคารที่ 14 กันยายน พ.ศ. 2564
Javascript ทำ Login อย่างง่าย
<!-- Sweetalert2 -->
<script src="sweetalert2.all.min.js"></script>
<script>
function myLogin(){
Swal.fire({
title: "Password required",
text: "Please input correct password:",
input: 'text',
showCancelButton: true
}).then((result) => {
if (result.value!='123') {
Swal.fire({
title: 'Wrong password..',
text: "Use another passw is not : "+result.value,
type: 'success',
}).then(function (result) {
if (true) {
location.reload();
}
})
}else{
return true
}
});
}
window.onload = myLogin; // use or not-use
</script>
<!-- ORIGINAL Style -->
<script>
function myLogin(){
var password = prompt("Please enter your password", "");
if (password == '2114') {
return true
}else{
alert('Wrong password !')
location.href = "mbook_generator.php"
return false
}
}
window.onload = myLogin;
</script>
วันจันทร์ที่ 13 กันยายน พ.ศ. 2564
การครอบ html tag บนข้อความเดิม

การครอบ html tag บนข้อความเดิม หรือ how to quickly wrap text with HTML tags in Visual Studio
ด้วยวิธีติดตั้ง extenssion ชื่อ htmltagwrap
Link
https://marketplace.visualstudio.com/items?itemName=bradgashler.htmltagwrap
Installation Options
Option 1. Search for htmltagwrap in VS Code extensions tab and install it.
Option 2. Go to the marketplace link mentioned above and click on install, it will prompt you to open it with VS Code and once you do that it'll be installed.
Usage
Select one or more blocks of text or strings of text.
Press Alt + W or Option + W for Mac.
Type the tag name you want.
หมายเหตุ :
ครั้งแรกที่กด Alt + W จะมาครอบด้วย tag <p>
แล้วสามารถพิมพ์ทับด้วย tag ที่ต้องการได้เลย....work!!..สุดๆ
Zen Code ด้วย Emmet ใน VSCODE

ref : https://docs.emmet.io/cheat-sheet/
ตัวอย่างการเขียน zen coding ด้วย emmet ใน vscode ที่จะทำให้การเขียนโปรแกรมได้เร็วขึ้นมาก
h2{Helloworld}
ผลลัพธ์
<h2>Helloworld<h2>
remark: {}คือใส่ข้อความ
tabale>tr>td
ผลลัพธ์
<table>
<tr>
<td></td>
</tr>
</table>
remark: > คือ ส่วนลูก chield
tabale>tr>td*3
ผลลัพธ์
<table>
<tr>
<td></td>
<td></td>
<td></td>
</tr>
</table>
remark: * คือ ส่วนที่ทำซ้ำๆ
table>tr*3>td*2
ผลลัพธ์
<table>
<tr>
<td></td>
<td></td>
</tr>
<tr>
<td></td>
<td></td>
</tr>
<tr>
<td></td>
<td></td>
</tr>
</table>
div.main
ผลลัพธ์
<div class="main"></div> remark: . คือ class
div#main
ผลลัพธ์
<div id="main"></div> remark: # คือ id
ปล.:Snippets ending with + not work
วันศุกร์ที่ 10 กันยายน พ.ศ. 2564
Express ไม่ต้องติดตั้ง Body Parser แล้ว
You might not need to install the additional body-parser package to your application if you are using Express 4.16+. There are many tutorials that include the installation of body-parser because they are dated prior to the release of Express 4.16. (on 2018)
วันพฤหัสบดีที่ 9 กันยายน พ.ศ. 2564

วันอาทิตย์ที่ 29 สิงหาคม พ.ศ. 2564
สร้าง CRUD ด้วย Node และ MongoDB
การเขียนโปรแกรมจัดการฐานข้อมูล CRUD สมัยใหม่นิยมแบ่งลักษณะของการเขียนเป็น Front-End และ Back-End แยกกัน โดยเรียกผ่านทาง API ซึ่งที่ทำให้การเขียนโปรแกรมสามารถทำได้สะดวกยิ่งขึ้นมาก และยังสามารถนำมาใช้ร่วมกับ Webserver ที่มีการใช้ในปัจจุบัน
วันอังคารที่ 3 สิงหาคม พ.ศ. 2564
MySQL to PostgreSQL Convert

วิธีแก้ ดังนี้
1.ต้องระบุที่ field date ว่า default เป็น NULL (ติ๊กที่ null ในแก้ไขฟิวด์ของ phpmyadmin)
2.Run คำสั่ง SQL ของทุกฟิวด์ที่เป็น Date ดังนี้ เช่น
UPDATE qa_self_t8 SET vac_date=NULL WHERE vac_date='0000-00-00'
3.แล้วค่อย export เป็น CSV (ไม่ใช่ CSV for MS Excel)
4.import ด้วย HeidiSQL ดังนี้

ปล. อย่าลืมสร้างตารางใน PostgreSQL รอก่อน โดยใช้บริการแปลง SQL จาก http://www.sqlines.com/online
วันพฤหัสบดีที่ 29 กรกฎาคม พ.ศ. 2564
วิธี Backup ข้อมูลขนาดใหญ่ จาก Mysql
วิธี Backup ข้อมูลขนาดใหญ่ จาก Mysql
1.Run script ของ mysqldumper จากServer
2.Download ไฟล์ที่ได้จากข้อ (1)
3.แตก zip ให้เป็น .sql
4.ใช้โปรแกรม HeidiSQL
5.นำเข้า Mysql ใน PC ด้วยคำสั่ง File->Run SQL File
ตัวอย่าCode PHP MongoDB

//read all data
//$mng = new MongoDB\Driver\Manager("mongodb://localhost:27017");
$mng = new MongoDB\Driver\Manager("mongodb://root:testtest@localhost:27017");
$query = new MongoDB\Driver\Query([]);
$rows = $mng->executeQuery("q_alert_db.qa_sys_user", $query);
foreach ($rows as $man) {
echo "$man->fname $man->lname<br>";
}
//read with sort and limit 5
//$mng = new MongoDB\Driver\Manager("mongodb://localhost:27017");
$mng = new MongoDB\Driver\Manager("mongodb://root:testtest@localhost:27017");
$query = new MongoDB\Driver\Query([], ['sort' => [ 'fname' => 1], 'limit' => 5]);
/* 'sort' => [ 'fname' => -1] */
$rows = $mng->executeQuery("q_alert_db.qa_sys_user", $query);
foreach ($rows as $man) {
echo "$man->fname $man->lname<br>";
}
//filter and wilde card
//$mng = new MongoDB\Driver\Manager("mongodb://localhost:27017");
$mng = new MongoDB\Driver\Manager("mongodb://root:testtest@localhost:27017");
$filter = [ 'office_id' => array('$regex' => '12')];
$options = ['projection' => ['_id' => 0],'sort' => ['office_id' => -1]];
$query = new MongoDB\Driver\Query($filter, $options);
$res = $mng->executeQuery('q_alert_db.qa_sys_user', $query);
$c=1;
foreach ($res as $man) {
if(substr($man->office_id,0,2)=='12'){ //แก้ปัญหา ที่จะแสดงทุกค่าที่มี 12
echo "$c $man->fname $man->lname $man->office_id<br>";
$c++;
}
}
//insert or write data
//$mng = new MongoDB\Driver\Manager("mongodb://localhost:27017");
$mng = new MongoDB\Driver\Manager("mongodb://root:testtest@localhost:27017");
$bulk = new MongoDB\Driver\BulkWrite;
$doc = ['_id' => new MongoDB\BSON\ObjectID,
'username' => 'Toyota',
'password' => 'aaa',
'login_type' =>'1',
'login_status' =>'1'
];
$bulk->insert($doc);
/*
$bulk->update(['name' => 'Audi'], ['$set' => ['price' => 52000]]);
$bulk->delete(['name' => 'Hummer']);
*/
$mng->executeBulkWrite('q_alert_db.qa_sys_user', $bulk);
echo "Insert Data Already\n";
การนับจำนวน Count Document ใน MongoDB

การนับจำนวน document หรือ record สำหรับ mongoDB
ที่คำนวณได้รวดเร็วที่สุด ดังนี้
//$mongo = new MongoDB\Driver\Manager("mongodb://localhost:27017");
$mng = new MongoDB\Driver\Manager("mongodb://root:testtest@localhost:27017");
$command = new MongoDB\Driver\Command(["count" => "qa_self_t8"]);
$result = $mng->executeCommand("q_alert_db", $command);
$res = current($result->toArray());
$count = $res->n;
echo $count;
หากต้องการ filter ให้เปลี่ยน $command เป็น
$myfilter = ["verify" => "1"];
$command = new MongoDB\Driver\Command(["count" => "qa_self_t8", "query" => $query]);
ดังนี้
$mng = new MongoDB\Driver\Manager("mongodb://root:testtest@localhost:27017");
$myfilter = ["verify" => "1"];
$command = new MongoDB\Driver\Command(["count" => "qa_self_t8", "query" => $myfilter]);
$result = $mng->executeCommand("q_alert_db", $command);
$res = current($result->toArray());
$count = $res->n;
echo $count;
วันพุธที่ 16 มิถุนายน พ.ศ. 2564
วิธีการแปลง html to PDF
Credit : https://github.com/ks-satra/mPDF
วิธีการแปลง html to PDF
1. ขั้นตอนแรกไปโหลด mPDF มาก่อนเลย
2. แตกไฟล์ จะได้โฟลเดอร์ที่ข้างในบรรจุไฟล์ต่างๆ ของ mPDF
3. ทำการออกรายงานในรูปแบบ html
4. เพิ่มส่วนบนสุด
<?php include("../pdf-property/mpdf/mpdf.php");
include("../pdf-property/datepdf/view.php");
ob_start(); ?>
5. เพิ่มส่วนล่างสุด
<?Php
$html = ob_get_contents();
ob_end_clean();
$pdf = new mPDF('th', 'A4', '0', 'TH SarabunPSK');
$pdf->SetAutoFont();
$pdf->SetDisplayMode('fullpage');
$pdf->WriteHTML($html, 2);
$pdf->Output();
?>
ตัวอย่าง
<?php
include("pdf-property/mpdf/mpdf.php");
include("pdf-property/datepdf/view.php");
ob_start();
?>
<!DOCTYPE html>
<html lang="en">
<head>
<meta charset="UTF-8">
<meta http-equiv="X-UA-Compatible" content="IE=edge">
<meta name="viewport" content="width=device-width, initial-scale=1.0">
<title>Document</title>
</head>
<body>
<h1>ADISAK</h1>
</body>
</html>
<?Php
$html = ob_get_contents();
ob_end_clean();
$pdf = new mPDF('th', 'A4', '0', 'TH SarabunPSK');
$pdf->SetAutoFont();
$pdf->SetDisplayMode('fullpage');
$pdf->WriteHTML($html, 2);
$pdf->Output();
?>
หมายเหตุ : สามารถกำหนดชื่อไฟล์ที่ต้องการให้ download ได้
$file_name = 'T8_'.$passport_no.'.pdf'; //adi
$pdf->Output($file_name, 'I'); //adi
Parameter
'D': download the PDF file
'I': serves in-line to the browser
'S': returns the PDF document as a string
'F': save as file $file_out
วันพฤหัสบดีที่ 10 มิถุนายน พ.ศ. 2564
REST API ทดสอบแล้ว
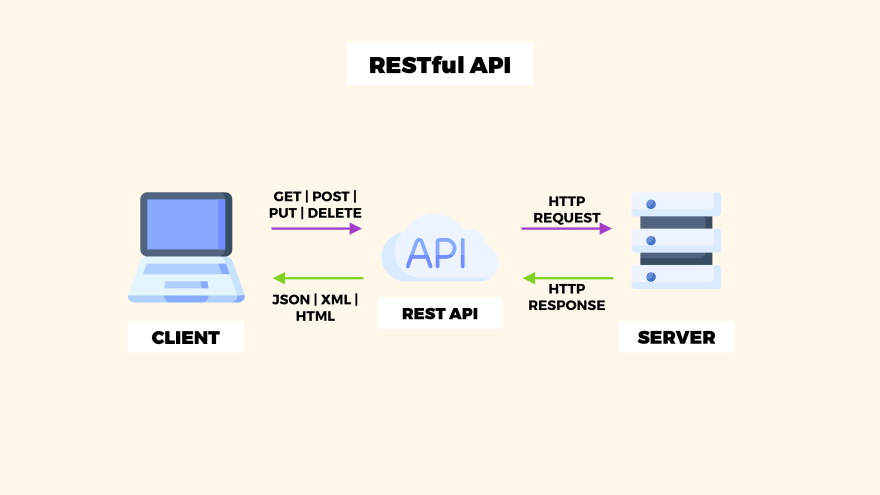
ได้ทดสอบเขียน REST API โดบแบ่งเป็น 2 ส่วน(A,B) ดังนี้
////////////////A.ไฟล์สำหรับบริการข้อมูล///////////////////////////////////////
1.api_employee.php เป็นไฟล์ที่ให่บริการ Api อยู่ในServerที่มี DB
<?php
//กำหนดค่า Access-Control-Allow-Origin ให้ เครื่อง อื่น ๆ สามารถเรียกใช้งานหน้านี้ได้
header("Access-Control-Allow-Origin: *");
header("Content-Type: application/json; charset=UTF-8");
header("Access-Control-Allow-Methods: OPTIONS,GET,POST,PUT,DELETE");
header("Access-Control-Max-Age: 3600");
header("Access-Control-Allow-Headers: Content-Type, Access-Control-Allow-Headers, Authorization, X-Requested-With");
//ตั้งค่าการเชื่อมต่อฐานข้อมูล
$link = mysqli_connect('localhost', 'root', 'testtest', 'test_db');
mysqli_set_charset($link, 'utf8');
$requestMethod = $_SERVER["REQUEST_METHOD"];
////////////////PART 1 ////////////////////
//ตรวจสอบหากใช้ Method GET
if($requestMethod == 'GET'){
//ตรวจสอบการส่งค่า id
if(isset($_GET['id']) && !empty($_GET['id'])){
$id = $_GET['id'];
//คำสั่ง SQL กรณี มีการส่งค่า id มาให้แสดงเฉพาะข้อมูลของ id นั้น
$sql = "SELECT * FROM employees WHERE id = $id";
}else{
//คำสั่ง SQL แสดงข้อมูลทั้งหมด
$sql = "SELECT * FROM employees";
}
$result = mysqli_query($link, $sql);
//สร้างตัวแปร array สำหรับเก็บข้อมูลที่ได้
$arr = array();
while ($row = mysqli_fetch_assoc($result)) {
$arr[] = $row;
}
echo json_encode($arr, JSON_UNESCAPED_UNICODE);
//JSON_UNESCAPED_UNICODE สำหรับแสดงข้อมูลเป็นภาษาไทย
}
//PART 2 for POST//////////////////////ADD by ADISAK
//อ่านข้อมูลที่ส่งมาแล้วเก็บไว้ที่ตัวแปร data
$data = file_get_contents("php://input");
//แปลงข้อมูลที่อ่านได้ เป็น array แล้วเก็บไว้ที่ตัวแปร result
$result = json_decode($data,true);
//ตรวจสอบการเรียกใช้งานว่าเป็น Method POST หรือไม่
if($requestMethod == 'POST'){
if(!empty($result)){
$firstName = $result['first_name'];
$lastName = $result['last_name'];
$emailAddress = $result['email_address'];
//คำสั่ง SQL สำหรับเพิ่มข้อมูลใน Database
$sql = "INSERT INTO employees (id,first_name,last_name,email_address) VALUES (NULL,'$firstName','$lastName','$emailAddress')";
$result = mysqli_query($link, $sql);
if ($result) {
echo json_encode(['status' => 'ok','message' => 'Insert Data Complete']);
} else {
echo json_encode(['status' => 'error','message' => 'Error']);
}
}
}
///////////PART 3 for PUT or Edit
//ตรวจสอบการเรียกใช้งานว่าเป็น Method PUT หรือไม่
if($requestMethod == 'PUT'){
//ตรวจสอบว่ามีการส่งค่า id มาหรือไม่
if(isset($_GET['id']) && !empty($_GET['id'])){
$id = $_GET['id'];
$firstName = $result['first_name'];
$lastName = $result['last_name'];
$emailAddress = $result['email_address'];
//คำสั่ง SQL สำหรับแก้ไขข้อมูลใน Database โดยจะแก้ไขเฉพาะข้อมูลตามค่า id ที่ส่งมา
$sql = "UPDATE employees SET first_name = '$firstName' , last_name = '$lastName' , email_address = '$emailAddress' WHERE id = $id";
$result = mysqli_query($link, $sql);
if ($result) {
echo json_encode(['status' => 'ok','message' => 'Update Data Complete']);
} else {
echo json_encode(['status' => 'error','message' => 'Error']);
}
}
}
////////////PART 3 DELETE
//ตรวจสอบการเรียกใช้งานว่าเป็น Method DELETE หรือไม่
if($requestMethod == 'DELETE'){
//ตรวจสอบว่ามีการส่งค่า id มาหรือไม่
if(isset($_GET['id']) && !empty($_GET['id'])){
$id = $_GET['id'];
//คำสั่ง SQL สำหรับลบข้อมูลใน Database ตามค่า id ที่ส่งมา
$sql = "DELETE FROM employees WHERE id = $id";
$result = mysqli_query($link, $sql);
if ($result) {
echo json_encode(['status' => 'ok','message' => 'Delete Data Complete']);
} else {
echo json_encode(['status' => 'error','message' => 'Error']);
}
}
}
////////////////B.ไฟล์สำหรับเรียกใช้บริการ///////////////////////////////////////
2.List.php ไฟล์สำรับเรียกใช้ สำหรับแสดงข้อมูล (อยู่ต่างServer)
<?php
$my_url="http://myreadysoft.net/apps/a/api_employee.php";
$curl = curl_init();
curl_setopt_array($curl, array(
CURLOPT_URL => $my_url,
CURLOPT_RETURNTRANSFER => true,
CURLOPT_ENCODING => "",
CURLOPT_MAXREDIRS => 10,
CURLOPT_TIMEOUT => 30,
CURLOPT_HTTP_VERSION => CURL_HTTP_VERSION_1_1,
CURLOPT_CUSTOMREQUEST => "GET"
));
$response = curl_exec($curl);
$err = curl_error($curl);
curl_close($curl);
if ($err) {
echo "cURL Error #:" . $err;
} else {
echo $response;
}
//Adisak
echo "<br><br>";
$json_decoded = json_decode($response);
echo '<table border=1>';
foreach($json_decoded as $result){
echo '<tr>';
echo '<td>'.$result->id.'</td>';
echo '<td>'.$result->first_name.'</td>';
echo '<td>'.$result->last_name.'</td>';
echo '<td>'.$result->email_address.'</td>';
echo '</tr>';
}
echo '</table>';
echo "Data from : ".$my_url;
?>
3.Add.php ไฟล์ใช้บริการ สำหรับเพิ่มข้อมูล(อยู่ต่างServer)
<?php
$data = json_encode(array(
"first_name" => "John",
"last_name" => "Smith",
"email_address" => "smith@abc.com"
));
$my_url="http://myreadysoft.net/apps/a/api_employee.php";
$curl = curl_init();
curl_setopt_array($curl, array(
CURLOPT_URL => $my_url,
CURLOPT_RETURNTRANSFER => true,
CURLOPT_ENCODING => "",
CURLOPT_MAXREDIRS => 10,
CURLOPT_TIMEOUT => 30,
CURLOPT_HTTP_VERSION => CURL_HTTP_VERSION_1_1,
CURLOPT_CUSTOMREQUEST => "POST",
CURLOPT_POSTFIELDS => $data
));
$response = curl_exec($curl);
$err = curl_error($curl);
curl_close($curl);
if ($err) {
echo "cURL Error #:" . $err;
} else {
echo $response;
}
4.Edit.php ไฟล์ใช้บริการ สำหรับแก้ไขข้อมูล(อยู่ต่างServer)
<?php
$data = json_encode(array(
"first_name" => "Manuk",
"last_name" => "Pumi",
"email_address" => "pumit@abc.com"
));
$my_url="http://myreadysoft.net/apps/a/api_employee.php?id=11";
$curl = curl_init();
curl_setopt_array($curl, array(
CURLOPT_URL => $my_url,
CURLOPT_RETURNTRANSFER => true,
CURLOPT_ENCODING => "",
CURLOPT_MAXREDIRS => 10,
CURLOPT_TIMEOUT => 30,
CURLOPT_HTTP_VERSION => CURL_HTTP_VERSION_1_1,
CURLOPT_CUSTOMREQUEST => "PUT",
CURLOPT_POSTFIELDS => $data
));
$response = curl_exec($curl);
$err = curl_error($curl);
curl_close($curl);
if ($err) {
echo "cURL Error #:" . $err;
} else {
echo $response;
}
5.Delete.php ไฟล์ใช้บริการ สำหรับลบข้อมูล(อยู่ต่างServer)
<?php
$my_url="http://myreadysoft.net/apps/a/api_employee.php?id=11";
$curl = curl_init();
curl_setopt_array($curl, array(
CURLOPT_URL => $my_url,
CURLOPT_RETURNTRANSFER => true,
CURLOPT_ENCODING => "",
CURLOPT_MAXREDIRS => 10,
CURLOPT_TIMEOUT => 30,
CURLOPT_HTTP_VERSION => CURL_HTTP_VERSION_1_1,
CURLOPT_CUSTOMREQUEST => "DELETE"
));
$response = curl_exec($curl);
$err = curl_error($curl);
curl_close($curl);
if ($err) {
echo "cURL Error #:" . $err;
} else {
echo $response;
}
///////////////////////////////////////////////////////////////////////////////////////////////////////////
/*CREDIT https://monkeywebstudio.com/basic-restful-web-api-phpmysql/ */
วันศุกร์ที่ 21 พฤษภาคม พ.ศ. 2564
หลักการเขียน REST API อย่างง่าย
Create and Consume Simple REST API in PHP
BASIC RESTful Web API PHP/MySQL
Books/REST API Design Rulebook.pdf
Thunder Client เครื่องมือทดสอบ REST API ที่อาจมาแทนที่ Postman!?
สอนสร้าง REST API ด้วย PHP & MySQL - [ Beginners ]
วันพฤหัสบดีที่ 6 พฤษภาคม พ.ศ. 2564
PHP 8.0.5 and MongDB 4.4.5 Code Snippet
//Connection
$manager=new MongoDB\Driver\Manager("mongodb://root:testtest@localhost:27017");
db='myDB';
$collection='myCollection';
//All Data List
$query=new MongoDB\Driver\Query([]);
$rows=$manager->executeQuery($db.'.'.$collection, $query);
foreach($rows as $row) {
echo $row->_id.' ';
echo $row->fname.' ';
echo $row->lname.' ';
echo "<br>";
}
//DB List
$mng = new MongoDB\Driver\Manager("mongodb://localhost:27017");
$listdatabases = new MongoDB\Driver\Command(["listDatabases" => 1]);
$res = $mng->executeCommand("admin", $listdatabases);
$databases = current($res->toArray());
foreach ($databases->databases as $el) {
echo $el->name . "<br>";
}
//Insert
$fname = "ดาดา";
$lname = "ยะโกะ";
$bulk = new MongoDB\Driver\BulkWrite();
$doc = ['fname' => $fname, 'lname' => $lname];
$bulk->insert($doc);
$result = $manager->executeBulkWrite($db.'.'.$collection, $bulk);
//Filter with multiple Condition
$filter = [ 'office_id' => array('$regex' => '12901001'),
'occu' => array('$regex' => 'LorryDriver'),
'dec_date' => ['$gte' => '2021-01-01']
];
// 'dec_date' => array('$regex' => '2021-01') //เดือนเดียว
$options = [
'projection' => ['_id' => 0],
//'sort' => ['office_id' => -1]
];
$query = new MongoDB\Driver\Query($filter, $options);
$res = $mng->executeQuery($db.'.'.$collection, $query);
$c=0;
foreach ($res as $doc) {
echo $doc->office_id,' ' ,$doc->dec_date,' ',$doc->fullname,'<br>';
$c++;
}
How to Enable Authentication on MongoDB

How to Enable Authentication on MongoDB
https://medium.com/mongoaudit/how-to-enable-authentication-on-mongodb-b9e8a924efac
1. Start MongoDB without authentication
That’s easy, as this is the default behavior.
2. Connect to the server using the mongo shell
$ mongo mongodb://<host>:<port>
The port numberwill likely be 27017, but for additional security, you can always change it to a different one.
3. Create the user administrator
Change to the admin database:
> use admin
You need to create a user with the userAdminAnyDatabase role, which grants the privilege to create other users on any existing database. The following example will create the useradmin user with password “thepianohasbeendrinking”:
> db.createUser(
{
user: "useradmin",
pwd: "thepianohasbeendrinking",
roles: [ { role: "userAdminAnyDatabase", db: "admin" } ]
}
)
Then disconnect from the mongo shell (Ctrl+D).
4. Enable authentication in mongod configuration file
Open /etc/mongod.conf with your favorite code editor and search for the following lines:
security:
authorization: "enabled"
หมายเหตุ : -ใน laragon อยู่ที่ mongodb/
-เพื่อความสะดวกในการเขียนโปรแกรมใน Notebook ให้
security:
authorization: "disabled"
แต่ใน script กำหนด username/passord สำหรับการ connect ได้ เช่น
$manager=new MongoDB\Driver\Manager("mongodb://root:testtest@localhost:27017");
$db='aaa';
$collection='a1';
$query=new MongoDB\Driver\Query([]);
$rows=$manager->executeQuery($db.'.'.$collection, $query);
foreach($rows as $row) {
echo $row->_id.' ';
echo $row->fname.' ';
echo $row->lname.' ';
echo "<br>";
}
วันจันทร์ที่ 3 พฤษภาคม พ.ศ. 2564
Mysql Export to JSON สำหรับนำเข้าใน MongDB
ดังนี้
<?php
date_default_timezone_set('Asia/Bangkok');
$today=date("Y-m-d_His");
include('../../db_inc.php');
ini_set('display_errors',0); //ปิดแสดง notice
ini_set('memory_limit', '-1'); //ปิดจำกัด memory
ini_set('max_execution_time', '-1'); //ปิดจำกัดเวลาประมวล
set_time_limit(0);
?>
<h3><?= str_repeat(' ', 20);?>The Adi JSON Data Coversion (version 04-05-2564)</h3>
<br>
<?
$sql_tbl = "SHOW TABLES FROM $dbname"; //SHOW Table
$result_tbl = mysql_query($sql_tbl);
?>
<form method="post" action="<?php echo $_SERVER['PHP_SELF']; ?>">
Choose table name
<select name="mytable" >
<option value="" selected> </option>
<?
while ($row_tbl = mysql_fetch_row($result_tbl)) {
echo "<option value='".$row_tbl[0]."'>".$row_tbl[0]."</option>";
}
?>
</select>
<?= str_repeat(' ', 3);?>
<input type="checkbox" name="showonscreen" value="showonscreen">
Show on screen <?= str_repeat(' ', 3);?>
<input type="checkbox" name="createjsonfile" value="createjsonfile">
Create file <?= str_repeat(' ', 3);?>
<input type="submit" name="submit" value="Submit Form">
</form>
<?
mysql_free_result($result_tbl);
////////////////////END FORM//////////////////////////
if(isset($_POST['submit']))
{
//echo "Start data on screen listing...<br><br>";
$mytable = $_POST['mytable'];
$myshow = $_POST['showonscreen'];
$mycreate = $_POST['createjsonfile'];
//echo $myshow; die;
$sql = "SELECT * FROM ".$mytable; //fetch table rows from mysql db
$result = mysql_query($sql);
$num_rows = mysql_num_rows($result);
$emparray = array(); //create an array
while($row =mysql_fetch_assoc($result))
{
$emparray[] = $row;
}
if($myshow=='showonscreen'){ //display on screen when checked
echo "<br>Start data on screen listing...".$num_rows." records<br><br>";
echo json_encode($emparray, JSON_UNESCAPED_UNICODE); // มี JSON_UNESCAPED_UNICODE เพื่อภาษาไทย
echo "<br><br>End of listing...<br>";
}
mysql_free_result($result);
mysql_close($conn);
}
////////////////END FORM SUBMIT////////////////////
if($mycreate=='createjsonfile'){ //create json file when checked //write to json file
$jpath = 'json_exported/'; //create this folder first by manual
$jfile = $jpath.$mytable."_".$today.".json";
$fp = fopen($jfile, 'w');
fwrite($fp, json_encode($emparray, JSON_UNESCAPED_UNICODE)); // มี JSON_UNESCAPED_UNICODE เพื่อภาษาไทย
fclose($fp);
echo "<br>";
echo "<br>";
echo "<div style='position:absolute;left:10px;top:100px;width:500px;height:20px;'>";
echo "<a href='".$jfile."'>Download JSON file by Right Click</a>";
echo "</div>";
}
?>
หมายเหตุ : ทดสอบแล้วโดยนำไฟล์ที่ได้แล้วน้ำเข้าด้วย MongoDB Compass
ใช้ไฟล์ขนาด 400000+ record เร็วมาก ใช้เวลาเพียง 25 วินาทีเท่านั้น...
วันอาทิตย์ที่ 2 พฤษภาคม พ.ศ. 2564
การ Import Data เข้าใน MongoDB
การนำเข้าข้อมูลจาก Mysql(Table) เข้าเก็บใน MongoDB(Document)
สามารถทำได้ดังนี้
1.ใช้ MongoDB Compass ดาวน์โหลดได้ที่
https://www.mongodb.com/try/download/database-tools
3.แก้ไขไฟล์ JSON โดยตัดคำสั่ง comment ออกให้หมด เหลือข้อมูลล้วนๆ
4.เข้า MongoDB Compass แล้ว Connect
5.เลือก DB (ถ้ายังไม่มี ให้สร้าใหม่)
6.dbl-click เลือก collection ที่ต้องการ (ถ้ายังไม่มี ให้สร้าใหม่)
7.นำเข้า ด้วยการเลือกไฟล์ JSON ที่เตรียมมา
วันเสาร์ที่ 1 พฤษภาคม พ.ศ. 2564
Laragon PHP8-MongDB-nginX

การใช้ Laragon PHP8-MongDB-nginX
เพื่อมิให้ไปรบกวนกับของที่มีอยู่เดิม เช่น AppServ หรือ XAMPP
-กำหนดใช้ port ของ nginX เป็น 8083
-กำหนดใช้ port ของ MongoDB เป็น 27017 (เป็นค่าDefaultอยู่แล้ว)
Download
Laragon
https://laragon.org/download/index.html
MonoDB
https://www.mongodb.com/try/download/community
RoboMongo
https://robomongo.org/download
PHP 8
https://windows.php.net/download#php-8.0
PHP 8 MongoDB dll
https://pecl.php.net/package/mongodb/1.9.1/windows
VDO Tutorial
https://www.youtube.com/watch?v=P0ahcFoMwnM
https://www.youtube.com/watch?v=2xwkSYB3ax0
https://www.youtube.com/watch?v=vviGLB5hmuk
Cara Menambahkan Database MongoDB di Laragon
https://www.youtube.com/watch?v=EsFGBZCrzSk
Sample Project
https://www.sitepoint.com/building-simple-blog-app-mongodb-php/
วันศุกร์ที่ 5 มีนาคม พ.ศ. 2564
หลักการสื่อสารข้อมูลระหว่างเว็ปหรือURL ด้วย JSON
1.สร้าง Api เพื่อรับค่า query string แล้วแสดงผลข้อมูลเป็น JSON
[สำหรับรอการร้องขอข้อมูลด้วย query string]
ไฟล์ชื่อ api.php ดังนี้
<?php
$conn = mysql_connect("localhost", "root", "");
mysql_select_db("q_alert_db");
mysql_query("set NAMES utf8");
$my_pid = @$_GET['p'];
$response = array();
$sql = "SELECT fullname,age,sex,nationality,tel_in_thai,addr_in_th_place,addr_in_th_province
FROM YourTable WHERE pid='".$my_pid."'
ORDER BY dec_date DESC, dec_time DESC LIMIT 1";
$result = mysql_query($sql);
if($result){
header("Content-Type: JSON");
$i=0;
while ($row = mysql_fetch_assoc($result)) {
$response[$i]['name'] = $row['fullname'];
$response[$i]['age'] = $row['age'];
$response[$i]['sex'] = $row['sex'];
$response[$i]['nationality'] = $row['nationality'];
$response[$i]['tel'] = $row['tel_in_thai'];
$response[$i]['addr'] = $row['addr_in_th_place'].' จ.'.trim($row['addr_in_th_province']);
$i++;
}
echo json_encode($response,JSON_UNESCAPED_UNICODE);
}else{
echo "No Data..";
}
mysql_free_result($result);
?>
2.สร้างไฟล์เรียกใช้ข้อมูล JSON จาก api ด้วย JQuery [สำหรับการรับข้อมูลจาก Api ไปใช้ประโยชน์]
ไฟล์ชื่อ lab_from_api_js.php ดังนี้
<!DOCTYPE html>
<html lang="en">
<head>
<title>JavaScript - read JSON from URL</title>
<!-- <script src="https://code.jquery.com/jquery-3.2.1.min.js"></script> -->
<script src="assets/js/jquery-3.2.1.min.js"></script>
</head>
<body>
<?
$my_p = @$_GET[p];
$my_pid = trim($my_p);
$my_link = "https://borderapi.songkhla.care/borderAPI?p=".$my_pid."&key=b9343bdbf698cbc25b1528b0512e6210";
?>
<script>
$.getJSON('<?=$my_link;?>', function(data) {
$.post("lab_put_indb.php", {
data1: data[0].identification_number,
data2: data[0].name,
data3: data[0].surname,
data4: data[0].nationality,
data5: data[0].gender,
data6: data[0].age,
data7: data[0].addr,
data8: data[0].tel,
data9: data[0].border,
data10: data[0].date_entry,
data11: data[0].date_reported,
data12: data[0].result},
function(result){
$("#div1").html(result);
}
);
</script>
<div id="div1">..ไม่มีผลตรวจ..</div>
</body>
</html>
ไฟล์ชื่อ lab_put_indb.php ดังนี้
<?php
$my_pid = @$_POST["data1"];
$my_name = @$_POST["data2"];
$my_surname = @$_POST["data3"];
$my_nationality = @$_POST["data4"];
$my_sex = @$_POST["data5"];
$my_age = @$_POST["data6"];
$my_addr = @$_POST["data7"];
$my_tel = @$_POST["data8"];
$my_poe = @$_POST["data9"];
$my_date_entry = @$_POST["data10"];
$my_date_reported = @$_POST["data11"];
$my_result = @$_POST["data12"];
echo "<table><tr><td>";
//Display result on the previous page
echo "เลขบัตร ปชช. : ".$my_pid."</br>";
echo "ชื่อ : ".$my_name."</br>";
echo "สกุล : ".$my_surname."</br>";
echo "สัญชาติ : ".$my_nationality."</br>";
echo "เพศ : ".$my_sex."</br>";
echo "อายุ : ".$my_age."</br>";
echo "ที่อยู่ : ".$my_addr."</br>";
echo "โทร : ".$my_tel."</br>";
echo "ด่านฯ : ".$my_poe."</br>";
echo "วันที่ตรวจ : ".datetothai($my_date_entry)."</br>";
echo "วันที่รายงาน : ".datetothai($my_date_reported)."</br>";
if($my_result=='Not detected'){
$my_result_txt='ไม่พบเชื้อ';
}
echo "ผลตรวจ : ".$my_result_txt."</br>";
?>
หมายเหตุ : ต้องใช้ extension ชื่อ Moesif CORS ร่วมด้วยเสมอ
เมื่อติดตั้ง extension แล้ว จะทำให้ Youtube เปิดไม่ได้นะครับ
หากค้องการดู youtube ต้องปิด extension นี้ก่อน น่ะ
สมัครสมาชิก:
บทความ (Atom)